Who’s Using Snowpack?


Overview
What is Snowpack?
Snowpack is a modern, lightweight toolchain for faster web development. Traditional JavaScript build tools like webpack and Parcel need to rebuild & rebundle entire chunks of your application every time you save a single file. This rebundling step introduces lag between hitting save on your changes and seeing them reflected in the browser.
Snowpack serves your application unbundled during development. Every file only needs to be built once and then is cached forever. When a file changes, Snowpack rebuilds that single file. There’s no time wasted re-bundling every change, just instant updates in the browser (made even faster via Hot-Module Replacement (HMR)). You can read more about this approach in our Snowpack 2.0 Release Post.
Snowpack’s unbundled development still supports the same bundled builds that you’re used to for production. When you go to build your application for production, you can plug in your favorite bundler via an official Snowpack plugin for Webpack or Rollup (coming soon). With Snowpack already handling your build, there’s no complex bundler config required.
Snowpack gets you the best of both worlds: fast, unbundled development with optimized performance in your bundled production builds.
Key Features
- A frontend dev environment that starts up in 50ms or less.
- Changes reflected instantly in the browser.
- Integrates your favorite bundler for production-optimized builds.
- Out-of-the-box support for TypeScript, JSX, CSS Modules and more.
- Connect your favorite tools with third-party plugins.
Library Support
- React
- Preact
- Svelte
- Vue
- lit-html
- lit-element
- Styled Components
- Tailwind CSS
- and more!
Tooling Support
- Babel
- TypeScript
- PostCSS
- Sass
- esbuild
- 11ty
- and more!
Browser Support
Snowpack builds your site for both modern and legacy browsers. Even IE11 is supported. You can control and customize this behavior with the “browserlist” package.json property.
The only requirement is that during development you use a modern browser. Any recent release of Firefox, Chrome, or Edge will do. This is required to support the modern, bundle-free ESM imports that load your application in the browser.
Community
Join the Pika Discord for discussion, questions about Snowpack or related Pika projects, or to show off what you’re working on!
Get Started
Install Snowpack
# using npm
npm install --save-dev snowpack

# using yarn
yarn add --dev snowpack
Snowpack can also be installed globally via npm install -g snowpack. But, we recommend installing locally in every project via --save-dev/--dev. You can run the Snowpack CLI locally via package.json “scripts”, npm’s npx snowpack, or via yarn snowpack.
Quick Start
Here’s a short list of what you can do with Snowpack:
# Start your dev server, load your site locally
snowpack dev

# Build your site for production
snowpack build

# Build your site, but watch the file system and rebuild when files change.
# Great for local development with your own dev server (ex: Rails)
snowpack build --watch

# See more helpful info
snowpack --help
Create Snowpack App (CSA)
The easiest way to get started with Snowpack is via Create Snowpack App (CSA). CSA automatically initializes a starter application for you with a pre-configured, Snowpack-powered dev environment.
If you’ve ever used Create React App, this is a lot like that!
npx create-snowpack-app new-dir --template [SELECT FROM BELOW] [--use-yarn]Official App Templates
- @snowpack/app-template-blank
- @snowpack/app-template-blank-typescript
- @snowpack/app-template-react
- @snowpack/app-template-react-typescript
- @snowpack/app-template-preact
- @snowpack/app-template-svelte
- @snowpack/app-template-vue
- @snowpack/app-template-lit-element
- @snowpack/app-template-lit-element-typescript
- @snowpack/app-template-11ty
- See all community templates
Migrating an Existing App
Migrating an existing app to Snowpack is meant to be painless, since Snowpack supports most features and build tools that you’re already using today (Babel, PostCSS, etc). If this is your first time using Snowpack you should start with a Create Snowpack App (CSA) template, copy over your “src” & “public” files from your old app, and then run snowpack dev, troubleshooting any remaining issues.
CSA is a good starting point for an existing application because it has a few common tools (like Babel) built in by default to replicate the full feature set of a traditional bundled app. CSA is also meant to be a drop-in replacement for Create React App, so any existing Create React App project should run via CSA with zero changes needed.
If you run into issues, search the rest of our docs site for information about importing CSS from JS and from CSS, asset references, and more.
Main Concepts
Unbundled Development
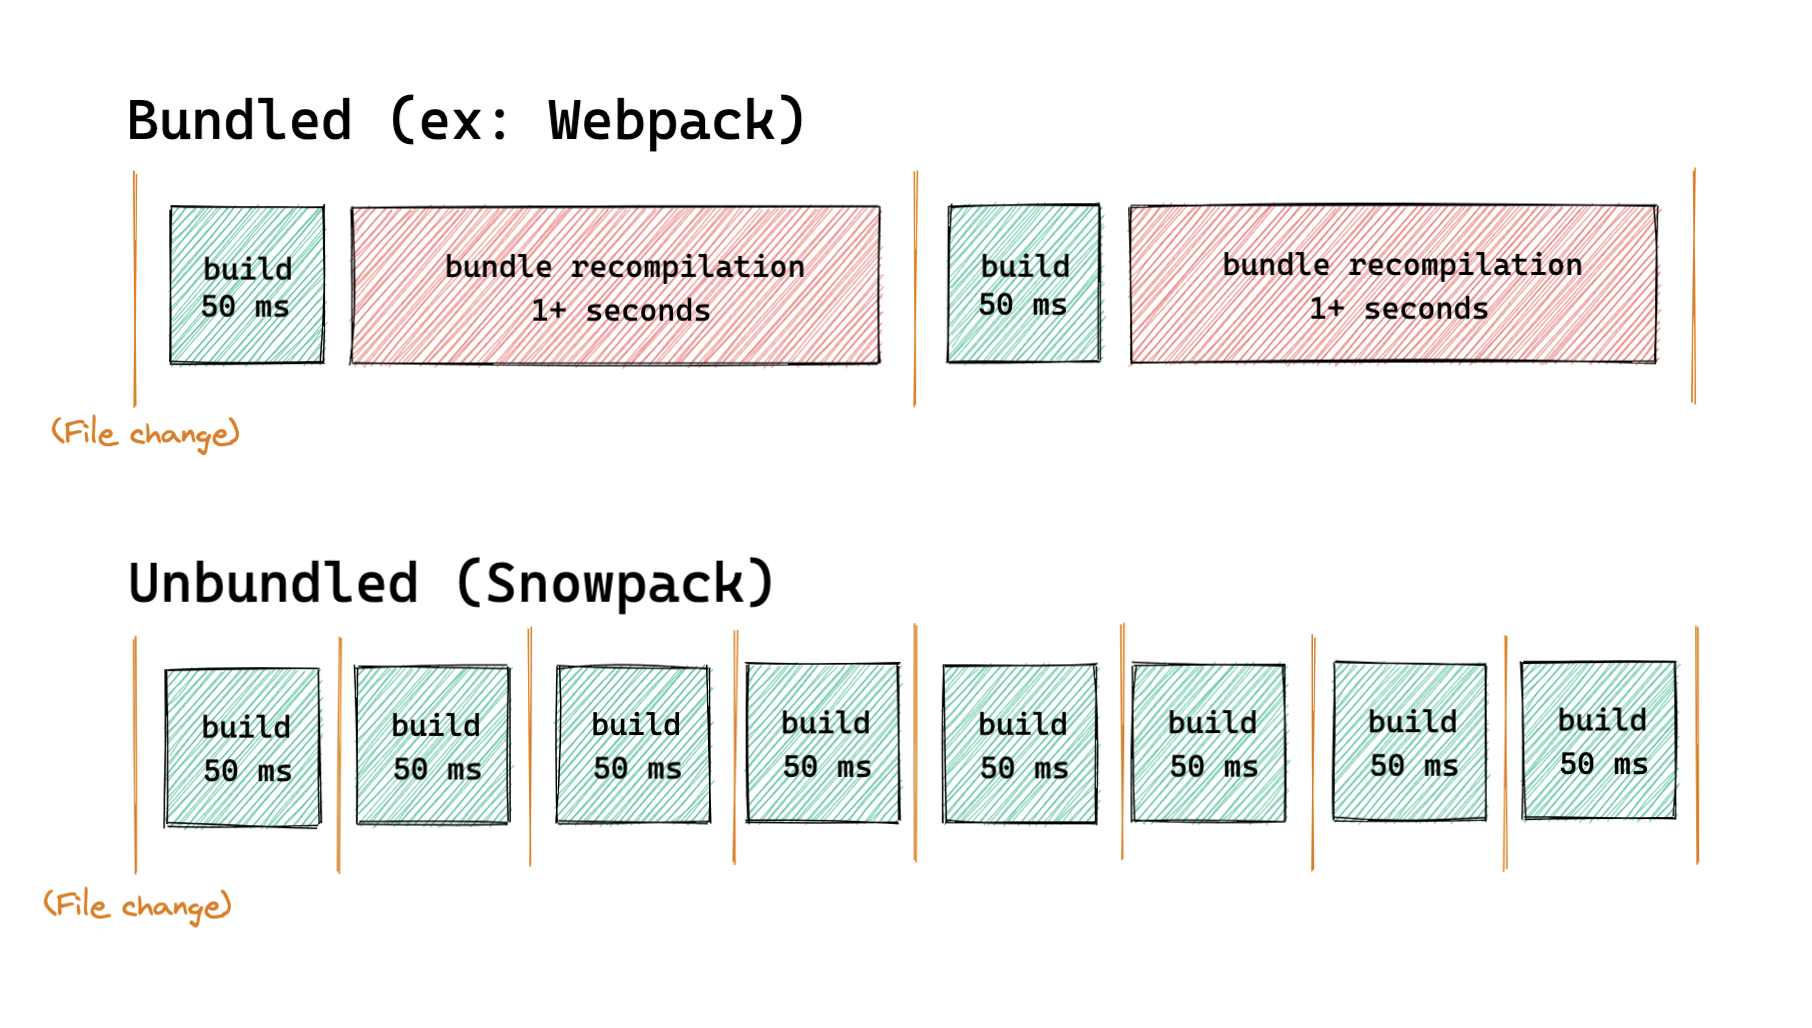
Unbundled development is the idea of shipping individual files to the browser during development. Files can still be built with your favorite tools (like Babel, TypeScript, Sass) and then loaded individually in the browser with dependencies thanks to ESM import and export syntax. Any time you change a file, Snowpack only ever needs to rebuild that single file.
The alternative is bundled development. Almost every popular JavaScript build tool today focuses on bundled development. Running your entire application through a bundler introduces additional work and complexity to your dev workflow that is unnecessary now that ESM is widely supported. Every change – on every save – must be rebundled with the rest of your application before your changes can be reflected in your browser.
Unbundled development has several advantages over the traditional bundled development approach:
- Single-file builds are fast.
- Single-file builds are deterministic.
- Single-file builds are easier to debug.
- Project size doesn’t affect dev speed.
- Individual files cache better.
That last point is key: Every file is built individually and cached indefinitely. Your dev environment will never build a file more than once and your browser will never download a file twice (until it changes). This is the real power of unbundled development.
Using NPM Dependencies
NPM packages are mainly published using a module syntax (Common.js, or CJS) that can’t run on the web without some build processing. Even if you write your application using browser-native ESM import and export statements that would all run directly in the browser, trying to import any one npm package will force you back into bundled development.
Snowpack takes a different approach: Instead of bundling your entire application for this one requirement, Snowpack processes your dependencies separately. Here’s how it works:
node_modules/react/**/*     -> http://localhost:3000/web_modules/react.js
node_modules/react-dom/**/* -> http://localhost:3000/web_modules/react-dom.js
- Snowpack scans your website/application for all used npm packages.
- Snowpack reads these installed dependencies from your
node_modulesdirectory. - Snowpack bundles all of your dependencies separately into single JavaScript files. For example:
reactandreact-domare converted toreact.jsandreact-dom.js, respectively. - Each resulting file can be run directly in the browser, and imported via ESM
importstatements. - Because your dependencies rarely change, Snowpack rarely needs to rebuild them.
After Snowpack builds your dependencies, any package can be imported and run directly in the browser with zero additional bundling or tooling required. This ability to import npm packages natively in the browser (without a bundler) is the foundation that all unbundled development and the rest of Snowpack is built on top of.
<!-- This runs directly in the browser with `snowpack dev` -->
<body>
  <script type='module'>
    import React from 'react';
    console.log(React);
  </script>
</body>
Snowpack’s Dev Server

snowpack dev - Snowpack’s dev server is an instant dev environment for unbundled development. The dev server will only build a file when it’s requested by the browser. That means that Snowpack can start up instantly (usually in <50ms) and scale to infinitely large projects without slowing down. In contrast, it’s common to see 30+ second dev startup times when building large apps with a traditional bundler.
Snowpack supports JSX & TypeScript source code by default. You can extend your build even further with custom plugins that connect Snowpack with your favorite build tools: TypeScript, Babel, Vue, Svelte, PostCSS, Sass… go wild!
Snowpack’s Build Pipeline
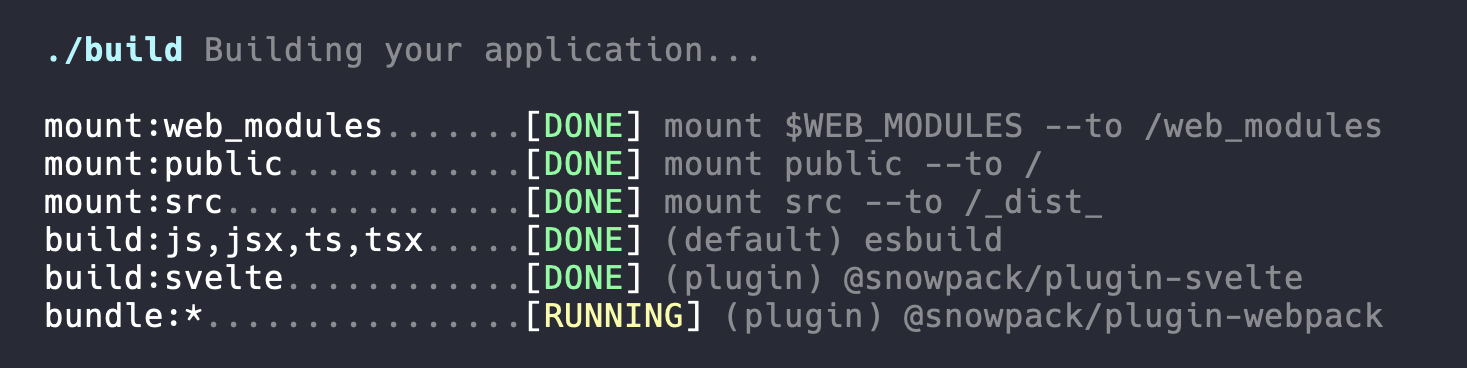
snowpack build - When you’re ready to deploy your application, run the build command to generate a static production build of your site. Building is tightly integrated with your dev setup so that you are guaranteed to get a near-exact copy of the same code that you saw during development.
Bundle for Production
You should be able to use a bundler because you want to, and not because you need to. That was the original concept that Snowpack was designed to address. Snowpack treats bundling as an optional production optimization, which means you’re free to skip over the extra complexity of bunling until you need it.
By default, snowpack build will build your site using the same unbundled approach as the dev command. This is fine for most projects, but you also may still want to bundle for production. Legacy browser support, code minification, code-splitting, tree-shaking, dead code elimination, and other performance optimizations are all handled in Snowpack via bundling.
Connect your favorite bundler to Snowpack via a one-line plugin . Bundlers normally require dozens or even hundreds of lines of configuration, but with Snowpack it’s just a one-line change to your project config file. Snowpack builds your application before sending it to the bundler, so that all the bundler needs to do is worry about bundling the final JavaScript & CSS. No custom configuration required.
Snowpack ships with official support for webpack. Connect the "@snowpack/plugin-webpack" plugin in your Snowpack configuration file and then run snowpack build to see your optimized, bundled build.
// snowpack.config.json
// [npm install @snowpack/plugin-webpack]
{
  // Optimize your production builds with Webpack
  "plugins": [["@snowpack/plugin-webpack", {/* ... */}]]
}
JavaScript
ES Modules (ESM)
Snowpack was designed to support JavaScript’s native ES Module (ESM) syntax. ESM lets you define explicit imports & exports that browsers and build tools can better understand and optimize for. If you’re familiar with the import and export keywords in JavaScript, then you already know ESM!
// ESM Example - src/user.js
export function getUser() { /* ... */

// src/index.js
import {getUser} from './user.js';
All modern browsers support ESM, so Snowpack is able to ship this code directly to the browser during development. This is what makes Snowpack’s unbundled development workflow possible.
Snowpack also lets you import non-JavaScript files directly in your application. Snowpack handles all this for you automatically so there’s nothing to configure, using the following logic:
Import NPM Packages
// Returns the React & React-DOM npm packages
import React from 'react';
import ReactDOM from 'react-dom';
Snowpack lets you import npm packages directly in the browser. Even if a package was published using a legacy format, Snowpack will up-convert the package to ESM before serving it to the browser.
When you start up your dev server or run a new build, you may see a message that Snowpack is “installing dependencies”. This means that Snowpack is converting your dependencies to run in the browser.
Import JSON
// Returns the JSON object via the default import
import json from './data.json';
Snowpack supports importing JSON files, which return the full JSON object in the default import.
Import CSS
// Loads './style.css' onto the page
import './style.css';
Snowpack supports basic CSS imports inside of your JavaScript files. When you import a CSS file via the import keyword, Snowpack will automatically apply those styles to the page. This works for CSS and compile-to-CSS languages like Sass & Less.
If you prefer, Snowpack also supports any popular CSS-in-JS library for styling.
Import CSS Modules
/* src/style.module.css */
.error {
  background-color: red;
}
// 1. Converts './style.module.css' classnames to unique, scoped values.
// 2. Returns an object mapping the original classnames to their final, scoped value.
import styles from './style.module.css';
// This example uses JSX, but you can use CSS Modules with any framework.
return <div className={styles.error}>Your Error Message</div>;Snowpack supports CSS Modules using the [name].module.css naming convention. CSS Modules work just like normal CSS imports, but with a special default styles export that maps your original classnames to unique identifiers.
Import Images & Other Assets
import img from './image.png'; // img === '/src/image.png'
import svg from './image.svg'; // svg === '/src/image.svg'

// This example uses JSX, but you can use these references with any framework.
<img src={img} />;
All other assets not explicitly mentioned above can be imported and will return a URL reference to the final built asset. This can be useful for referencing non-JS assets by URL, like creating an image element with a src attribute pointing to that image.
Features
Snowpack ships with built-in support for the following file types, no configuration required:
- JavaScript (
.js,.mjs) - TypeScript (
.ts,.tsx) - JSX (
.jsx,.tsx) - CSS (
.css) - CSS Modules (
.module.css) - Images (
.svg,.jpg,.png, etc.)
To customize build behavior and support new languages (.scss, .svelte, .vue), keep reading.
Import Aliases
// Instead of this:
import Button from `../../../../components/Button`;

// You can do this:
import Button from `@app/components/Button`;
Snowpack supports setting custom import aliases for your project via the top-level alias property. This can be used to define an alias for either a local source directory (like aliasing @app to ./src) or a package (like aliasing react to preact/compat). See the full documentation for alias below.
TypeScript Users: You’ll need to configure your tsconfig.json paths to get proper types from top-level imports. Learn more about “path mappings”.
// tsconfig.json
{
  "compilerOptions": {
    "baseUrl": ".",
    "paths": {
      // Define either ONE of these...
      // 1. General support: matches everything relative to the project directory
      "*": ["*"],
      // 2. Explicit support: match only your mounted directories (Recommended!)
      "src/*": ["src/*"],
      "public/*": ["public/*"],
    }
  }
}
Environment Variables
// `import.meta.env` - Read process.env variables in your web app
fetch(`${import.meta.env.SNOWPACK_PUBLIC_API_URL}/users`).then(...)

// Supports destructuring as well:
const {SNOWPACK_PUBLIC_API_URL} = import.meta.env;
fetch(`${SNOWPACK_PUBLIC_API_URL}/users`).then(...)

// Instead of `import.meta.env.NODE_ENV` use `import.meta.env.MODE`
if (import.meta.env.MODE === 'development') {
  // ...
You can read environment variables directly in your web application via import.meta.env. If you’ve ever used process.env in Create React App or any Webpack application, this behaves exactly the same.
For your safety, Snowpack only supports environment variables that begin with SNOWPACK_PUBLIC_*. We do this because everything in your web application is sent to the browser, and we don’t want you to accidentally share sensitive keys/env variables with your public web application. Prefixing your frontend web env variables with SNOWPACK_PUBLIC_ is a good reminder that they will be shared with the world.
import.meta.env.MODE and import.meta.env.NODE_ENV are also both set to the current process.env.NODE_ENV value, so that you can change app behavior based on dev vs. build. The env value is set to development during snowpack dev and production during snowpack build. Use this in your application instead of process.env.NODE_ENV.
Remember: that these env variables are statically injected into your application for everyone at build time, and not runtime.
.env File Support
// snowpack.config.json
{
  "plugins": ["@snowpack/plugin-dotenv"]
}
Add the @snowpack/plugin-dotenv plugin to your dev environment to automatically load environment variables from your project .env files. Visit the plugin README to learn more.
Hot Module Replacement
Hot Module Replacement (HMR) is the ability to update your web app during development without refreshing the page. Imagine changing some CSS, hitting save, and then instantly seeing your change reflected on the page without a refresh. That’s HMR.
Snowpack supports full HMR out-of-the-box for the following served files:
- CSS
- CSS Modules
- JSON
Popular frameworks can also be set up for HMR. Create Snowpack App (CSA) ships with HMR enabled by default for all of the following frameworks. If you’re not using CSA, you can setup HMR in your application with a simple plugin or a few lines of code:
- Preact: @prefresh/snowpack
- React: @snowpack/plugin-react-refresh
- Svelte: A few lines of code
- Vue: A few lines of code
For more advanced, bare-metal HMR integrations, Snowpack created ESM-HMR, a standard HMR API for any ESM-based dev environment. Any HMR integration built for ESM-HMR will run on Snowpack and any other ESM-HMR-enabled dev server. To use the HMR API directly (via import.meta.hot) check out the ESM-HMR spec to learn more.
if (import.meta.hot) {
  import.meta.hot.accept(({module}) => {
    // Accept the module, apply it to your application.
  });
  import.meta.hot.dispose(() => {
    // Cleanup any side-effects. Optional.
  });
}Dev Request Proxy
// snowpack.config.json
// Example: Proxy "/api/pokemon/ditto" -> "https://pokeapi.co/api/v2/pokemon/ditto"
{
  "proxy": {
    "/api": "https://pokeapi.co/api/v2",
  }
}
Snowpack can proxy requests from the dev server to external URLs and APIs. Making API requests directly the dev server can help you mimic your production environment during development.
See the Proxy Options section for more information and full set of configuration options.
HTTPS/HTTP2
npm start -- --secure
Snowpack provides an easy way to use a local HTTPS server during development through the use of the --secure flag. When enabled, Snowpack will look for a snowpack.key and snowpack.crt file in the root directory and use that to create an HTTPS server with HTTP2 support enabled.
Generating SSL Certificates
You can automatically generate credentials for your project via either:
- devcert (no install required):
npx devcert-cli generate localhost - mkcert (install required):
mkcert -install && mkcert -key-file snowpack.key -cert-file snowpack.crt localhost
Legacy Browser Support
You can customize the set of browsers you’d like to support via the package.json “browserslist” property, going all the way back to IE11. This will be picked up when you run snowpack build to build for production.
/* package.json */
"browserslist": ">0.75%, not ie 11, not UCAndroid >0, not OperaMini all",
If you’re worried about legacy browsers, you should also add a bundler to your production build. Check out our section on bundling for production for more info.
Note: During development (snowpack dev) we perform no transpilation for older browsers. Make sure that you’re using a modern browser during development.
CSS @import Support
Snowpack supports native CSS “@import” behavior. This behaves slightly differently from JavaScript’s import behavior. In CSS, @import 'foo/bar.css' points to the relative file ./foo/bar.css and not some package “foo”. There is no currently no way to use the native @import statement to import from a package by name.
If you’d like to use @import to import from a package by name, you can use PostCSS with the postcss-import plugin. Alternatively, you can use a JavaScript import to import a CSS file by package name (import 'foo/bar.css';).
Note for webpack users: If you’re migrating an existing app to snowpack, note that @import '~package/...' (URL starting with a tilde) is a syntax specific to webpack. With postcss-import you have to remove the ~ from your @imports.
Configuration
Snowpack’s behavior can be configured by CLI flags, a custom Snowpack config file, or both. See the table below for the full list of supported options.
Config Files
Snowpack supports configuration files in multiple formats, sorted by priority order:
--config [path]: If provided.package.json: A namespaced config object ("snowpack": {...}).snowpack.config.js: (module.exports = {...}).snowpack.config.json: ({...}).
CLI Flags
# Show helpful info
$ snowpack --help

# Show additional debugging logs
$ snowpack --verbose

# {installOptions: {dest: 'CUSTOM_DIR/'}}
$ snowpack install --dest CUSTOM_DIR/

# {devOptions: {bundle: true}}
$ snowpack dev --bundle

# {devOptions: {bundle: false}}
$ snowpack dev --no-bundle

# {buildOptions: {minify: false}}
$ snowpack build --no-minify
CLI flags will be merged with (and take priority over) your config file values. Every config value outlined below can also be passed as a CLI flag. Additionally, Snowpack also supports the following flags:
--config [path]Set the path to your project config file.--helpShow this help.--versionShow the current version.--reloadClear the local cache. Useful for troubleshooting installer issues.
All Config Options
{
  "install": [
    "htm",
    "preact",
    "preact/hooks", // A package within a package
    "unistore/full/preact.es.js", // An ESM file within a package (supports globs)
    "bulma/css/bulma.css" // A non-JS static asset (supports globs)
  ],
  "mount": { /* ... */ },
  "proxy": { /* ... */ },
  "plugins": [ /* ... */ ],
  "installOptions": { /* ... */ },
  "devOptions": { /* ... */ },
  "buildOptions": { /* ... */ },
}
Top-Level Options
extends|string- Inherit from a separate “base” config. Can be a relative file path, an npm package, or a file within an npm package. Your configuration will be merged on top of the extended base config.
exclude|string[]- Exclude any files from scanning, building, etc. Defaults to exclude common test file locations:
['**/node_modules/**/*', '**/__tests__/*', '**/*.@(spec|test).@(js|mjs)'] - Useful for excluding tests and other unnecessary files from the final build. Supports glob pattern matching.
- Exclude any files from scanning, building, etc. Defaults to exclude common test file locations:
install|string[]- Known dependencies to install with Snowpack. Useful for installing packages manually and any dependencies that couldn’t be detected by our automatic import scanner (ex: package CSS files).
mount.*- Mount local directories to custom URLs in your built application.
alias.*- Configure import aliases for directories and packages. See the section below for all options.
proxy.*- Configure the dev server to proxy requests. See the section below for all options.
plugins- Extend Snowpack with third-party tools and plugins. See the section below for more info.
installOptions.*- Configure how npm packages are installed. See the section below for all options.
devOptions.*- Configure your dev server. See the section below for all options.
buildOptions.*- Configure your build. See the section below for all options.
Install Options
dest|string- Default:
"web_modules" - Configure the install directory.
- Default:
sourceMap|boolean- Emit source maps for installed packages.
env|{[ENV_NAME: string]: (string | true)}- Sets a
process.env.environment variable inside the installed dependencies. If set to true (ex:{NODE_ENV: true}or--env NODE_ENV) this will inherit from your current shell environment variable. Otherwise, set to a string (ex:{NODE_ENV: 'production'}or--env NODE_ENV=production) to set the exact value manually.
- Sets a
treeshake|boolean- Default:
false, ortruewhen run withsnowpack build - Treeshake your dependencies to optimize your installed files. Snowpack will scan your application to detect which exact imports are used from each package, and then will remove any unused imports from the final install via dead-code elimination (aka tree shaking).
- Default:
installTypes|boolean- Install TypeScript type declarations with your packages. Requires changes to your tsconfig.json to pick up these types.
alias|{[mapFromPackageName: string]: string}- Alias an installed package name. This applies to imports within your application and within your installed dependency graph.
- Example:
"alias": {"react": "preact/compat", "react-dom": "preact/compat"}
namedExports|string[]- Legacy Common.js (CJS) packages should only be imported by the default import (Example:
import reactTable from 'react-table') - But, some packages use named exports in their documentation, which can cause confusion for users. (Example:
import {useTable} from 'react-table') - You can enable “fake/synthetic” named exports for Common.js package by adding the package name under this configuration.
- Example:
"namedExports": ["react-table"]
- Legacy Common.js (CJS) packages should only be imported by the default import (Example:
rollup- Snowpack uses Rollup internally to install your packages. This
rollupconfig option gives you deeper control over the internal rollup configuration that we use. rollup.plugins- Specify Custom Rollup plugins if you are dealing with non-standard files.rollup.dedupe- If needed, deduplicate multiple versions/copies of a packages to a single one. This helps prevent issues with some packages when multiple versions are installed from your node_modules tree. See rollup-plugin-node-resolve for more documentation.
- Snowpack uses Rollup internally to install your packages. This
Dev Options
port|number| Default:8080- The port number to run the dev server on.
out|string| Default:"build"- The local directory that we output your final build to.
bundle|boolean- Create an optimized, bundled build for production.
- You must have Parcel as a dev dependency in your project.
- If undefined, this option will be enabled if the
parcelpackage is found.
fallback|string| Default:"index.html"- When using the Single-Page Application (SPA) pattern, this is the HTML “shell” file that gets served for every (non-resource) user route. Make sure that you configure your production servers to serve this as well.
open|string| Default:"default"- Opens the dev server in a new browser tab. If Chrome is available on macOS, an attempt will be made to reuse an existing browser tab. Any installed browser may also be specified. E.g., “chrome”, “firefox”, “brave”. Set “none” to disable.
hostname|string| Default:localhost- The hostname where the browser tab will be open.
hmr|boolean| Default:true- Toggles whether or not Snowpack dev server should have HMR enabled.
secure|boolean- Toggles whether or not Snowpack dev server should use HTTPS with HTTP2 enabled.
Build Options
baseUrl|string| Default:/- In your HTML, replace all instances of
%PUBLIC_URL%with this (inspired by the same Create React App concept). This is useful if your app will be deployed to a subdirectory. Note: if you havehomepagein yourpackage.json, Snowpack will actually pick up on that, too.
- In your HTML, replace all instances of
clean|boolean| Default:false- Set to
trueif Snowpack should erase the build folder before each build.
- Set to
metaDir|string| Default:__snowpack__minify|boolean| Default:true- By default, Snowpack will minify your dependencies on
snowpack build. Disable this by setting this config option tominify: false.
- By default, Snowpack will minify your dependencies on
sourceMaps|boolean| Default:false- Experimental: Set to
trueto enable source maps
- Experimental: Set to
webModulesUrl|string| Default:web_modules- Rename your web modules directory.
Proxy Options
// snowpack.config.json
{
  "proxy": {
    // Short form:
    "/api/01": "https://pokeapi.co/api/v2/",
    // Long form:
    "/api/02": {
      on: { proxyReq: (p, req, res) => /* Custom event handlers (JS only) */ },
      /* Custom http-proxy options */
    }
  }
}
If desired, "proxy" is where you configure the proxy behavior of your dev server. Define different paths that should be proxied, and where they should be proxied to.
The short form of a full URL string is enough for general use. For advanced configuration, you can use the object format to set all options supported by http-proxy.
on is a special property for setting event handler functions on proxy server events. See the section on “Listening for Proxy Events” for a list of all supported events. You must be using a snowpack.config.js JavaScript configuration file to set this.
This configuration has no effect on the final build.
Mount Options
// snowpack.config.json
{
  "mount": {
    // Files in the local "src/" directory are written to `/_dist_/*` in the final build.
    "src": "/_dist_",
    // Files in the local "public/" directory are written to `/*` in the final build.
    "public": "/"
    // … add other folders here
  }
}
The mount configuration lets you map local files to their location in the final build. If no mount configuration is given, then the entire current working directory (minus excluded files) will be built and mounted to the Root URL (Default: /, respects baseUrl).
Alias Options
Note: In an older version of Snowpack, all mounted directories were also available as aliases by default. As of Snowpack 2.7, this is no longer the case and no aliases are defined by default.
// snowpack.config.json
{
  alias: {
    // Type 1: Package Import Alias
    "lodash": "lodash-es",
    "react": "preact/compat",
    // Type 2: Local Directory Import Alias (relative to cwd)
    "components": "./src/components"
    "@app": "./src"
  }
}
The alias config option lets you define an import alias in your application. When aliasing a package, this allows you to import that package by another name in your application. This applies to imports inside of your dependencies as well, essentially replacing all references to the aliased package.
Aliasing a local directory (any path that starts with “./”) creates a shortcut to import that file or directory. While we don’t necessarily recommend this pattern, some projects do enjoy using these instead of relative paths:
-import '../../../../../Button.js';
+import '@app/Button.js';
Plugins
Snowpack isn’t just a build tool for JavaScript, it is a build tool for your entire website. Babel, TypeScript, PostCSS, SVGR and any favorite build tool can be connected directly into Snowpack via 1-line plugins.
Snowpack plugins can be added to:
- Customize your build with new language/framework support (Svelte, Vue)
- Customize your build with new build tools (Babel, PostCSS)
- Run CLI commands during build and development (TypeScript, ESLint)
- Create custom transformations, specific to your exact application.
👉 Check out our advanced guide and learn how to create your own plugin.
Connect a Plugin
To make a plugin available, you have to put it in your project devDependencies list (package.json) which will install it locally (in your project) and make it available to snowpack.
For the official snowpack plugins, command would look like:
# for npm
npm install --save-dev @snowpack/[plugin-name]
# for yarn
yarn add --dev @snowpack/[plugin-name]
After that, you can connect the plugin to Snowpack via the "plugins" array in your Snowpack config. For example,
// snowpack.config.json
{
  "plugins": ["@snowpack/plugin-babel"]
}
This is all you need to add Babel to your application build pipeline. If the plugin supports it, you can also pass options to the plugin to configure its behavior:
// snowpack.config.json
{
  "plugins": [
    ["@snowpack/plugin-babel", { /* ... */}]
  ],
}
NOTE: The order of plugins is important, for example, if there are multiple plugins that load/build particular type of file, the first matching will take precedence. If it succeeds in the build task for the file, others will not be called for that particular build task.
Connect any Script/CLI
If you can’t find a plugin that fits your needs and don’t want to write your own, you can also run CLI commands directly as a part of your build using one of our two utility plugins: @snowpack/plugin-build-script & @snowpack/plugin-run-script.
@snowpack/plugin-build-script
// snowpack.config.json
// [npm install @snowpack/plugin-build-script]
{
  "plugins": [
    ["@snowpack/plugin-build-script", { "cmd": "postcss", "input": [".css"], "output": [".css"]}]
  ],
}
This plugin allows you to connect any CLI into your build process. Just give it a cmd CLI command that can take input from stdin and emit the build result via stdout. Check out the README for more information.
@snowpack/plugin-run-script
// snowpack.config.json
// [npm install @snowpack/plugin-run-script]
{
  "plugins": [
    ["@snowpack/plugin-run-script", { "cmd": "tsc --noEmit", "watch": "$1 --watch"}]
  ],
}
This plugin allows you to run any CLI command as a part of your dev and build workflow. This plugin doesn’t affect your build output, but it is useful for connecting developer tooling directly into Snowpack. Use this to add meaningful feedback to your dev console as you type, like TypeScript type-checking and ESLint lint errors.
Official Plugins
- @snowpack/plugin-babel
- @snowpack/plugin-dotenv
- @snowpack/plugin-parcel
- @snowpack/plugin-postcss
- @snowpack/plugin-react-refresh
- @snowpack/plugin-svelte
- @snowpack/plugin-vue
- @snowpack/plugin-webpack
👉 Check out our full list of official plugins.
Community Plugins
👉 Find your community plugin on npm.
Recipes
Below are a collection of guides for using different web frameworks and build tools with Snowpack. If you’d like to contribute a new recipe, feel free to edit the docs to add your own.
Supported Libraries
All of the following frameworks have been tested and guaranteed to work in Snowpack without issues. If you encounter an issue using any of the following, please file an issue.
- React
- Preact
- JSX
- HTM
- lit-html
- Vue (see below)
- Svelte (see below)
- Tailwind CSS (see below)
- Sass (see below)
- and many more!
- Literally… every library should work with Snowpack!
Some libraries use compile-to-JS file formats and do require a special build script or plugin. See the guide below for examples.
JSX
Snowpack has built-in support to handle .jsx & .tsx source files in your application.
Note: Snowpack’s default build does not support JSX in .js/.ts files. If you can’t use the .jsx/.tsx file extension, you can use Babel to build your application instead.
TypeScript
Snowpack has built-in support to handle .ts & .tsx source files in your application.
Snowpack supports live TypeScript type checking right in the Snowpack CLI dev console. Connect the TypeScript compiler (tsc) into your workflow using the snippet below.
// snowpack.config.json
// Example: Connect TypeScript CLI (tsc) reporting to Snowpack
{
  "plugins": [
    ["@snowpack/plugin-run-script", {"cmd": "tsc --noEmit", "watch": "$1 --watch"}]
  ]
}
Babel
Snowpack already comes with built-in support for building JavaScript, TypeScript, and JSX. However, If you would like to run your build through Babel instead, you can replace our default file builder with the official Snowpack Babel plugin.
The plugin will automatically read plugins & presets from your local project babel.config.* config file, if one exists.
// snowpack.config.json
"plugins": ["@snowpack/plugin-babel"],
Preact
You can import and use Preact without any custom configuration needed.
To use preact/compat: (the Preact+React compatability layer) alias the “compat” package to React in your install options:
// Example: Lets you import "react" in your application, but uses preact internally
// snowpack.config.json
"installOptions": {
  "alias": {
    "react": "preact/compat",
    "react-dom": "preact/compat"
  }
}
Vue
// snowpack.config.json
"plugins": ["@snowpack/plugin-vue"]
Svelte
// snowpack.config.json
"plugins": ["@snowpack/plugin-svelte"]
PostCSS
// snowpack.config.json
"plugins": [
  ["@snowpack/plugin-build-script", {"cmd": "postcss", "input": [".css"], "output": [".css"]}]
]
The postcss-cli package must be installed manually. You can configure PostCSS with a postcss.config.js file in your current working directory.
Tailwind CSS
// postcss.config.js
// Taken from: https://tailwindcss.com/docs/installation#using-tailwind-with-postcss
module.exports = {
  plugins: [
    // ...
    require('tailwindcss'),
    require('autoprefixer'),
    // ...
  ]
}
Tailwind ships with first-class support for PostCSS. To use Tailwind in your Snowpack project, connect PostCSS (see above) and add the recommended Tailwind PostCSS plugin to your snowpack configuration.
Follow the official Tailwind CSS Docs for more info.
Sass
// snowpack.config.json
// Example: Build all src/css/*.scss files to public/css/*
"plugins": [
  ["@snowpack/plugin-run-script", {"cmd": "sass src/css:public/css --no-source-map", "watch": "$1 --watch"}]
]

// You can configure this to match your preferred layout:
//
// import './App.css';
// "run:sass": "sass src:src --no-source-map",
//
// import 'public/css/App.css';
// "run:sass": "sass src/css:public/css --no-source-map",
// (Note: Assumes mounted public/ directory ala Create Snowpack App)
Sass is a stylesheet language that’s compiled to CSS. It allows you to use variables, nested rules, mixins, functions, and more, all with a fully CSS-compatible syntax. Sass helps keep large stylesheets well-organized and makes it easy to share design within and across projects.
Check out the official Sass CLI documentation for a list of all available arguments. You can also use the node-sass CLI if you prefer to install Sass from npm.
Note: Sass should be run as a “run:” script (see example above) to take advantage of the Sass CLI’s partial handling. A "build:scss" script would build each file individually as its served, but couldn’t handle Sass partials via @use due to the fact that Sass bundles these into the importer file CSS.
To use Sass + PostCSS, check out this guide.
ESLint
// snowpack.config.json
"plugins": [
  ["@snowpack/plugin-run-script", {
    "cmd": "eslint 'src/**/*.{js,jsx,ts,tsx}'",
    // Optional: Use npm package "watch" to run on every file change
    "watch": "watch \"$1\" src"
  }]
]
Webpack
// snowpack.config.json
{
  // Optimize your production builds with Webpack
  "plugins": [["@snowpack/plugin-webpack", {/* ... */}]]
}
Snowpack ships an official webpack plugin for optimizing your build. Connect the "@snowpack/plugin-webpack" plugin into your Snowpack configuration file and then run snowpack build to see your optimized, bundled build.
Workbox
The Workbox CLI integrates well with Snowpack. Run the wizard to bootstrap your first configuration file, and then run workbox generateSW to generate your service worker.
Remember that Workbox expects to be run every time you deploy, as a part of a production build process. If you don’t have one yet, create package.json "deploy" and/or "build" scripts to automate your production build process.
Server Side Rendering (SSR)
To connect your own server to snowpack dev for SSR, there are a few things that you’ll need to set up. Make sure that you include any Snowpack-built resources via script tags in your server’s HTML response:
<!-- Example: Create Snowpack App builds your src/ directory to the /_dist_/* directory -->
<script type="module" src="http://localhost:8080/_dist_/index.js"></script>
And make sure that your HTML response also includes code to configure HMR to talk to Snowpack’s dev server:
<!-- Configure Snowpack's HMR connection yourself, somewhere on your page HTML -->
<script>window.HMR_WEBSOCKET_URL = "ws://localhost:8080"</script>
Leaving Snowpack
Snowpack is designed for zero lock-in. If you ever feel the need to add a traditional application bundler to your stack (for whatever reason!) you can do so in seconds.
Any application built with Snowpack should Just Work™️ when passed through Webpack/Rollup/Parcel. If you are already importing packages by name in your source code (ex: import React from 'react') then you should be able to migrate to any popular bundler without issue.
If you are importing packages by full URL (ex: import React from '/web_modules/react.js'), then a simple Find & Replace should help you re-write them to the plain package name imports that most bundlers expect.
Troubleshooting
Node built-in could not be resolved
✖ /my-application/node_modules/dep/index.js
  "http" (Node.js built-in) could not be resolved.
Some packages are written with dependencies on Node.js built-in modules. This is a problem on the web, since Node.js built-in modules don’t exist in the browser. For example, import 'path' will run just fine in Node.js but would fail in the browser.
To solve this issue: you can either replace the offending package (pika.dev is a great resource for web-friendly packages) or add Node.js polyfill support:
// snowpack.config.js
// Plugin: https://github.com/ionic-team/rollup-plugin-node-polyfills
module.exports = {
  installOptions: {
    rollup: {
      plugins: [require('rollup-plugin-node-polyfills')()],
    },
  },
};
No such file or directory
ENOENT: no such file or directory, open …/node_modules/csstype/index.js
This error message would sometimes occur in older versions of Snowpack.
To solve this issue: Upgrade to Snowpack v2.6.0 or higher. If you continue to see this unexpected error in newer versions of Snowpack, please file an issue.
Package exists but package.json “exports” does not include entry
Node.js recently added support for a package.json “exports” entry that defines which files you can and cannot import from within a package. Preact, for example, defines an “exports” map that allows you to to import “preact/hooks” but not “preact/some/custom/file-path.js”. This allows packages to control their “public” interface.
If you see this error message, that means that you’ve imported a file path not allowed in the export map. If you believe this to be an error, reach out to the package author to request the file be added to their export map.
Uncaught SyntaxError: The requested module ‘/web_modules/XXXXXX.js’ does not provide an export named ‘YYYYYY’
Snowpack follow’s Node.js’s CJS-ESM interoperability strategy, where Common.js packages are always exported to the default export (import react) and do not support named exports (import * as react). Many packages, however, document these named exports in their READMEs and assume that your bundler will support it. We automatically add support for named exports to a small number of very popular packages (like React) that use this sort of documentation.
To solve this issue: Add the failing package to installOptions.namedExports and Snowpack will create those named exports for you automatically (note: you may need to re-run Snowpack with the --reload flag to apply this update).
// snowpack.config.json
{
  "installOptions": {
    "namedExports": ["someModule"]
  }
}

## Assets

- [Snowpack Logo (PNG, White)](/assets/snowpack-logo-white.png)
- [Snowpack Logo (PNG, Dark)](/assets/snowpack-logo-dark.png)
- [Snowpack Logo (PNG, Black)](/assets/snowpack-logo-black.png)
- [Snowpack Wordmark (PNG, White)](/assets/snowpack-wordmark-white.png)